ESX 5.0 Kickstart Installation
As I have 7 ESX 4.1 Servers in my Environment each with many VLANs, iSCSI and NFS Setting, I need to find a way to automate the installation and create a script that will bring consistency setting across my ESX farm. This is where I spend 2 days understanding the different options to automate this process.
I have dropped the use of DHCP+PXE+TFTP as it is too complicated to setup if I have another site to install. In addition, I can’t bring my whole DHCP+PXE+TFTP Servers setup into another site. In addition, if the installation site is in Customer environment, addition a DHCP+PXE+TFTP sound like a lot of things to explain and answer to customer.
I have read up the Auto Deployment from VMware which will install a diskless copy of ESXi on the targeted machine. Again, this method requires DHCP+PXE+TFTP in place for the environment. Diskless sound nice, but when I get to know the number of components require to get this work, I decided not to. Reason, if any of the components fail, you can’t get your ESXi back online. There are times when power failure occurred. Be it being planned or unplanned in Server Room or Datacenter that may require us to shut down our entire system infrastructure for 2 hours. I just can’t get the concept right that after I virtualized my entire environment, I need to get my DHCP+PXE+TFTP up before I can power up my ESXi. What if my DHCP+PXE+TFTP is in one of my ESXi Server? We will end up with some chicken and egg problem. Those who have implemented Microsoft HyperV will know the pain when a power failure occurred. Power up my AD first? Or power up my HyperV first? This are the moment that we realized that we cannot virtualize our too much.
That brings me to the most tradition way of installation: CD installation. If CD installation is used, you can’t do scripting and burn into the CD as and when you like. You still need a second component to store the script during installation in order to have the flexibility. Most of the time, an http server is recommended. But again, an extra component is an extra point of failure. Or we need to find some http server in our environment or in customer environment to start the installation. This is not that simple.
So, USB seems to be the best option. Browsing VMware documentation, USB installation of ESXi is possible, but looking into the making of the USB drive and transferring ESXi ISO image into the USB drive drove me crazy.
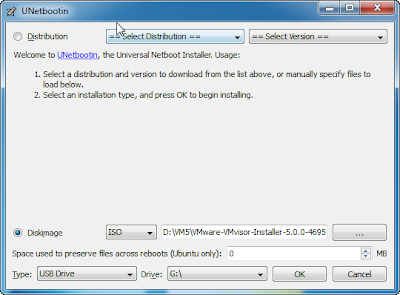
Searching the web for a simpler alternative, I found this software, “UNetbootin”. As of this writing this software can be found at http://unetbootin.sourceforge.net/ . You can read about the usage of the software at the above website. Is an Exe file that does not require installation on my PC. Which is great.
The installation step on preparing the USB drive is simple. Get an 1GB or more USB Drive (actual used space is only 306 MB). Run the UNetbootin software, select Diskimage, ISO and point to ESXi ISO file, Select USB Drive follow by your USB Drive letter. Click OK.
After one minute, you are done with a bootable ESXi USB Drive ready for installation. Do note that your USB drive should be in a single FAT32 partition before you run the process.
I figured out that the boot menu system is located on syslinux.cfg in the USB root directory. After some study, I come up with the following script. Which give me an option to point the ESXi to use 8 different script for 8 ESXi Server. I created a directory /ksscript in the USB Drive and added the following files to the directory, ks_tpesx01.cfg to ks_tpesx08.cfg.
default menu.c32
prompt 0
menu title ESXi-5.0.0-469512-standard Boot Menu
timeout 100
label StandardInstallation
menu label ESXi-5.0.0-469512-standard ^Installer
kernel /MBOOT.C32
append initrd=/ubninit -c boot.cfg
label ESX01
menu label ESX0^1 Scripted Installation
kernel /MBOOT.C32
append initrd=/ubninit -c boot.cfg ks=usb:/ksscript/ks_tpesx01.cfg +++
label ESX02
menu label ESX0^2 Scripted Installation
kernel /MBOOT.C32
append initrd=/ubninit -c boot.cfg ks=usb:/ksscript/ks_esx02.cfg +++
label ESX03
menu label ESX0^3 Scripted Installation
kernel /MBOOT.C32
append initrd=/ubninit -c boot.cfg ks=usb:/ksscript/ks_esx03.cfg +++
label ESX04
menu label ESX0^4 Scripted Installation
kernel /MBOOT.C32
append initrd=/ubninit -c boot.cfg ks=usb:/ksscript/ks_esx04.cfg +++
label ESX05
menu label ESX0^5 Scripted Installation
kernel /MBOOT.C32
append initrd=/ubninit -c boot.cfg ks=usb:/ksscript/ks_esx05.cfg +++
label ESX06
menu label ESX0^6 Scripted Installation
kernel /MBOOT.C32
append initrd=/ubninit -c boot.cfg ks=usb:/ksscript/ks_esx06.cfg +++
label ESX07
menu label ESX0^7 Scripted Installation
kernel /MBOOT.C32
append initrd=/ubninit -c boot.cfg ks=usb:/ksscript/ks_esx07.cfg +++
label ESX08
menu label ESX0^8 Scripted Installation
kernel /MBOOT.C32
append initrd=/ubninit -c boot.cfg ks=usb:/ksscript/ks_esx08.cfg +++
label hddboot
menu label ^Boot from local disk
LOCALBOOT 0x80
End of Part 1 - Getting the USB Drive Ready


Hi Thomas,
ReplyDeleteYour detailed description of the kickstart process has been quite helpful, and so I'd like to share the process I use for setting up the USB install drive.
Referenced from: http://www.vm-help.com/esx40i/ESXi_USB_install.php
1. Download SysLinux 3.72 - not the latest as it will not work
https://www.kernel.org/pub/linux/utils/boot/syslinux/3.xx/
2. On W7 run from where you downloaded it: \win32\syslinux.exe -mfa USB_DRIVE_LETTER
3. Extract ESXi 5.X to the usb (I used 7zip but there are plenty other), modify oem.tgz now if necessary
4. Rename ISOLINUX.CFG to SYSLINUX.CFG
5. Rename ISOLINUX.BIN to SYSLINUX.BIN
6. Boot, install, be happy
7. Edit SYSLIINUX.CFG, adding "ks=usb:/kickstart.cfg +++" to the append line. (or of course use your syslinux.cfg menu)
-Colin